A step-by-step way to build a MECE issue tree in PowerPoint using boxes and elbow connectors, plus what actually breaks when your hypothesis changes mid-analysis.
The first issue tree I ever built in PowerPoint took about forty minutes, and I was proud of it — clean boxes, even spacing, connectors that met each corner at a right angle. Then my manager looked at the underlying hypothesis for ten seconds and said the third branch wasn't actually MECE with the second one, it needed to split differently. Rebuilding the logic took five minutes. Re-aligning the boxes and connectors around the new structure took another thirty, because every box I moved dragged its connector out of alignment with the one next to it, and PowerPoint doesn't know that a connector attached to a box you just resized is supposed to still meet it at a clean right angle.
That ratio — five minutes of real thinking, thirty of shape-wrangling — is the actual bottleneck in issue tree slides, and it's the part most guides skip. Getting the MECE logic right is a thinking problem you solve with practice. Getting PowerPoint to hold that logic together as it changes is a mechanical problem, and it deserves its own method.
What an issue tree needs to do before you open PowerPoint
An issue tree breaks one root question into a small number of mutually exclusive, collectively exhaustive (MECE) branches, then breaks each of those into sub-branches, until you reach something specific enough to test with data or an interview. The two failure modes are well documented elsewhere: branches that overlap (not mutually exclusive) and branches that leave out a real possibility (not collectively exhaustive). Sketch the logic on paper or a whiteboard first, branch by branch, and don't open PowerPoint until you'd defend the split to your engagement manager. Building the shapes before the logic is settled is exactly what produces the wasted thirty minutes — you'll be rebuilding boxes around a hypothesis that's still moving.
Building it in PowerPoint: boxes and elbow connectors
Once the logic is fixed, the mechanical build is the same for a three-level tree or a five-level one:
- Set up a grid before placing any boxes. Turn on View → Gridlines and Guides, and decide your column width and row height for each tier of the tree up front. An issue tree lives or dies on visual alignment — a reader's eye reads the hierarchy from the grid, not from labels — so guessing spacing box by box is what causes the drift you'll be fixing later.
- Draw the root box, then duplicate it for every node. Don't draw each box fresh — duplicate (Ctrl/Cmd+D) the first one so every box at the same tier starts with identical size, fill, and font before you touch its position. Mismatched box sizes are the single most common thing that makes an issue tree look unfinished, and they're avoidable for free.
- Connect with the Elbow Connector, not a straight line or a drawn arrow. Insert → Shapes → Lines → Elbow Connector, then hover over the source box until you see the red connection points and drag to a connection point on the target box — not just near it. A connector anchored to a specific point on both boxes will follow if you move either box later; a line that's merely positioned between them won't, and that's the difference between a tree that survives an edit and one you rebuild from scratch.
- Group each tier, not the whole tree. Select all boxes and connectors in one tier (Ctrl/Cmd+G) so you can nudge that tier's spacing without disturbing the tiers above and below it. Grouping the entire tree at once defeats the purpose — you'll ungroup it the first time you need to touch one branch anyway.
- Leave room for the branch that isn't MECE yet. Your first draft of the logic is rarely your last. Build with one extra column of space on the widest tier so that when a branch needs to split into three instead of two, you're not resizing everything else on the slide to make room.
One more habit worth building in early: resist the urge to color-code branches by status or theme. It's tempting to make the "confirmed" branches green and the "ruled out" ones red, but on a real issue tree that status changes every time you get new evidence, so you end up re-coloring boxes on top of re-aligning them. A cleaner convention is to keep every box the same neutral fill and mark a ruled-out branch with a small "✕" and a one-line note underneath instead — it survives edits because it doesn't depend on remembering which color meant what two revisions ago, and it reads closer to how MBB decks actually present eliminated hypotheses.
What actually breaks when the hypothesis changes
The real test of an issue tree slide isn't how it looks when you finish it — it's what happens the third time your manager or the data sends you back to revise it. Three things go wrong most often:
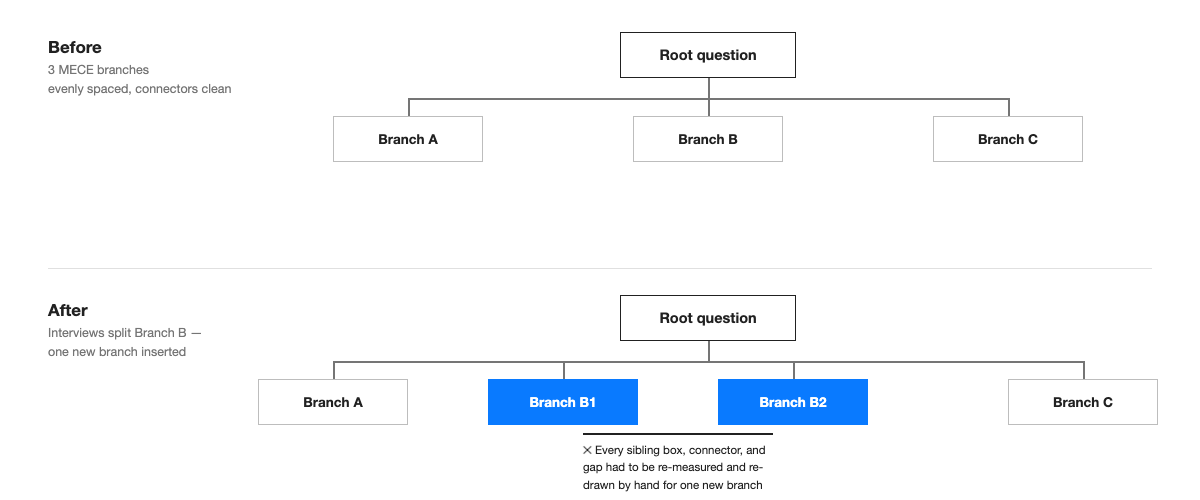
- Adding a branch shifts everything downstream of it. Insert a new sub-branch under one node, and every sibling node to its right needs to shift over, or the tree starts overlapping. This is the single biggest reason issue trees get rebuilt from scratch instead of edited — there's no native PowerPoint feature that reflows a tree the way a text outline reflows.
- Deleting a branch leaves an orphaned connector. Delete a box without first deleting its connector, and PowerPoint leaves a dangling line pointing at empty space — easy to miss in the moment, embarrassing when a partner notices it in review.
- Changing tier count breaks your grid. Going from three levels to four means every box in the tree needs to compress vertically to fit the same slide, which is a full re-layout, not a tweak, if you built without planning for it.
Where this stops being worth doing by hand
For a static issue tree you'll build once and never touch again, the boxes-and-connectors method above is genuinely fine — forty minutes, done. The problem is that issue trees are rarely static. They're a working document during the analysis phase, where the whole point is that the hypothesis moves as you get more evidence, and every move means touching alignment again. On a real engagement I've seen a three-branch tree go through six structural revisions in a week as interviews reshaped the hypothesis — and the realignment tax was paid six times, not once.
This is the specific case we built Advisio around: it reads the existing boxes and connectors in a tree, and when you add, remove, or restructure a branch, it re-lays out the surrounding boxes and re-anchors the connectors automatically, inside the same PowerPoint file — no separate diagramming tool, no re-export. You still do the thinking; the fifth revision costs the same thirty seconds as the first one instead of the same thirty minutes.
If you're building an issue tree once, the manual method above will serve you well — just build the grid and duplicate the boxes before you touch a connector. If you're building one that's going to move six times before the analysis is done, that's the version of the problem worth automating.